Feeding to a shoulder
Power feeding onto an electronic stop. This is the simplest useful thing the machine does, and it is worth doing once before you thread anything.
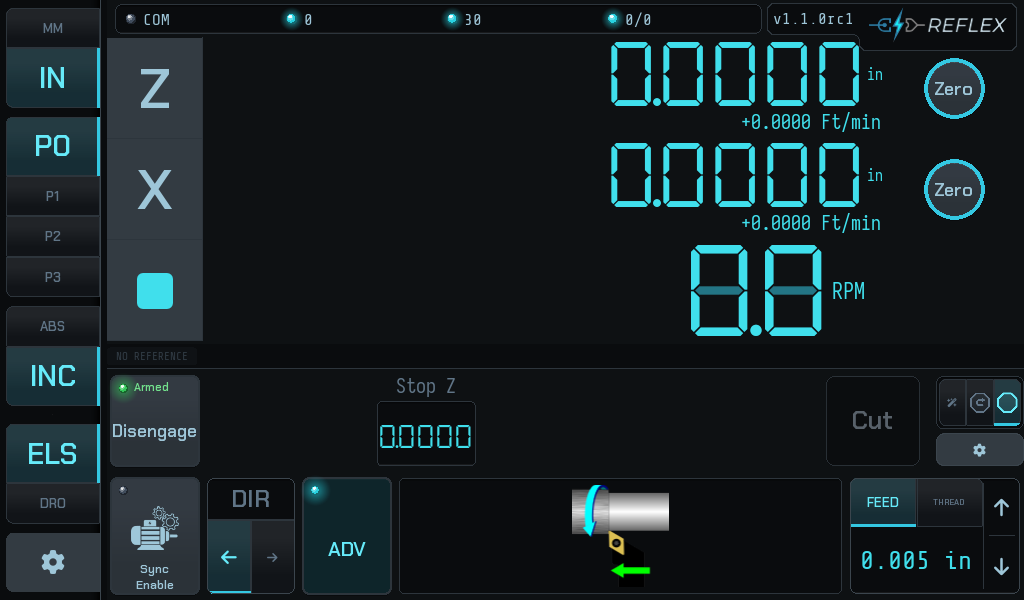
FEED is selected rather than THREAD, the rate reads in distance per
revolution rather than a pitch, and the illustration shows a turning tool rather
than a thread. Everything else behaves the same way.
What you are asking for
The carriage feeds under power at the selected rate until Z reaches the position you set, then stops. The stop is enforced by the firmware's motion ISR, not by the UI noticing and reacting — it is not subject to how busy the touchscreen is.
Steps
-
Choose FEED, not THREAD, in the selector at the bottom right, and set the feed rate with the ▲▼ steppers.
-
Set the direction with the DIR arrows. This is the direction the carriage will travel when the feed starts.
-
Set Stop Z. Pressing the field opens a keypad, which gives you two ways in:
- Type the position, if you know it from the drawing.
- Run the carriage to the shoulder by hand first, then press USE CURRENT on the keypad to take the position it is at.
The field shows
--until it holds a real value — a never-set stop reads as--rather than0.000, so it can never be mistaken for a target at the chuck.A shortcut, once you know it is there
Long-pressing the field captures the live position directly, skipping the keypad. Handy, but nothing else in this UI works that way, so it is not something to rely on remembering — the USE CURRENT button does the same job in plain sight.
-
Back the carriage off to where you want the feed to start.
-
Engage. The LED beside the button goes from
DisabledtoArmed. The stop is now live: if the spindle starts unexpectedly, the carriage is arrested at the stop rather than running on. -
Close the half nut, start the spindle, and press Cut.
The carriage feeds to the stop and holds there. Open the half nut, wind back, and go again.
Engaging with no stop set does nothing
The controller refuses to arm against a stop position it does not have — otherwise it would arm against whatever the firmware still held from a previous session, which could be a different shoulder or a different part. Set the stop first, then engage.
What the controller checks
Before the feed starts, the controller drives the leadscrew through its backlash and watches the Z scale to confirm the carriage actually moved. If it did not, the pass does not start:
Cut aborted — is the half-nut engaged?
That is the fault the check exists to catch. Close the half nut and press Cut again. Every other refusal is catalogued in When it refuses.
After the stop fires
The carriage holds at the stop. It does not spring back, and it does not creep: the firmware stops commanding steps and the servo holds position. Any residual motion you can measure at the tool is drivetrain compliance and the servo's own deceleration, not the controller changing its mind.